Trim and cut a video
Remove the parts you don’t need and export one video, with or without re-encoding.
In Tuck you cut a video into segments on the timeline and remove the ones you don’t want. What’s left comes out as one video.
Remove parts
- Click Add videos, or drag a video into the window, and select it in the Library.
- Move the playhead to where you want to cut, and press S or click Split. This only marks a cut on the timeline. It doesn’t make separate files.
- Click the segment you don’t want, then click Remove.
- To fine-tune a cut, drag the end of a segment.
Play the video to check the result. Playback skips the segments you removed, so what you see and hear is what you’ll get.
Each video in the Library has its own undo history, so Ctrl + Z only undoes changes to the video you’re working on. The Undo button says what it will undo, like Undo split. To start over, click Reset to make the video one whole segment again.
Choose how to export
At the bottom of the window, pick how you want to export:
- Compress makes a new file from your edit, usually to fit a size limit. See Compress a video to a file size.
- Upscale makes a new file at a higher resolution, like 1440p or 4K.
- Lossless cut joins the parts you kept without re-encoding, so nothing loses quality.
Lossless cut
A lossless cut copies the video and sound as they are, so the result looks exactly like the original. It works with MP4, MOV, MKV, WebM, MPEG-TS, and AVI files, and it keeps extra audio tracks, subtitles, and chapters too.
A video can only start cleanly on a keyframe, a full picture that the frames after it build on. So Tuck gives you two ways to cut:
- On keyframes copies the video as it is. Each part starts on a keyframe, so it can begin a moment after your cut. The Inspector tells you when that happens.
- Exact (Beta) starts each part on the exact frame you chose, by re-encoding just a few frames around each cut.
Turn on Keyframes to see them on the timeline, and press [ and ] to jump between them. That way you can put your cuts right on a keyframe.
Tuck checks every cut file before saving it. If it can’t check one, it saves it anyway and marks it Not checked.
To cut every video in the Library at once, use Export all cuts.
Next: Edit audioAll guides
Edit audio
Turn each audio track up, down, or off, mute parts of a video, and add music.
If you recorded game and mic audio as separate tracks, Tuck shows each one, so you can turn them up, down, or off on their own. You can also add music or any other sound.
Change the volume of a track
- Select the video in the Library and open the This video tab in the Inspector.
- Under Tracks, each track has its own row. Drag its slider to make it louder or quieter, or click its speaker to mute it. Double-click the slider to put it back where it started.
You can also mute a track with the speaker on its row in the timeline, but the volume slider is only in the Inspector.
In Tuck 0.6.1, the preview only plays the first track. Changes to the other tracks still end up in the export, even though you won’t hear them while editing.
To export a video with no sound at all, turn off Include in export under Output audio.
Mute part of a video
Click a segment on the timeline, then click Mute audio or press M. The video’s own sound goes silent for that segment, on every track. Press M again to bring it back.
To mute a shorter stretch, split it off first: move the playhead and press S.
Add music
- Click Add audio in the timeline toolbar, or drop a sound file anywhere in the window. Common formats like MP3, WAV, FLAC, and M4A all work.
- The song gets a track of its own, starting at the playhead. Drag the clip to move it, and drag its ends to trim it.
- To use a different part of the song, hold Alt while you drag the clip, or select it and use Overview and Detail in the Inspector.
- Set how loud it is with its track’s slider in the This video tab.
With a clip selected, S splits it at the playhead, M mutes just that clip, and Delete removes it. To remove the whole track, click its trash button and confirm with Remove.
Audio when you export
Compress and Upscale include all your audio changes. The exported video keeps its tracks separate, and added music goes into the first one.
Lossless cut copies the sound as it is, so it leaves out mutes, volume changes, and added music. The only audio setting there is Include audio.
Crop and resize a video
Crop to a shape like 9:16 or 1:1, rotate or flip the picture, and choose the size of the video you export.
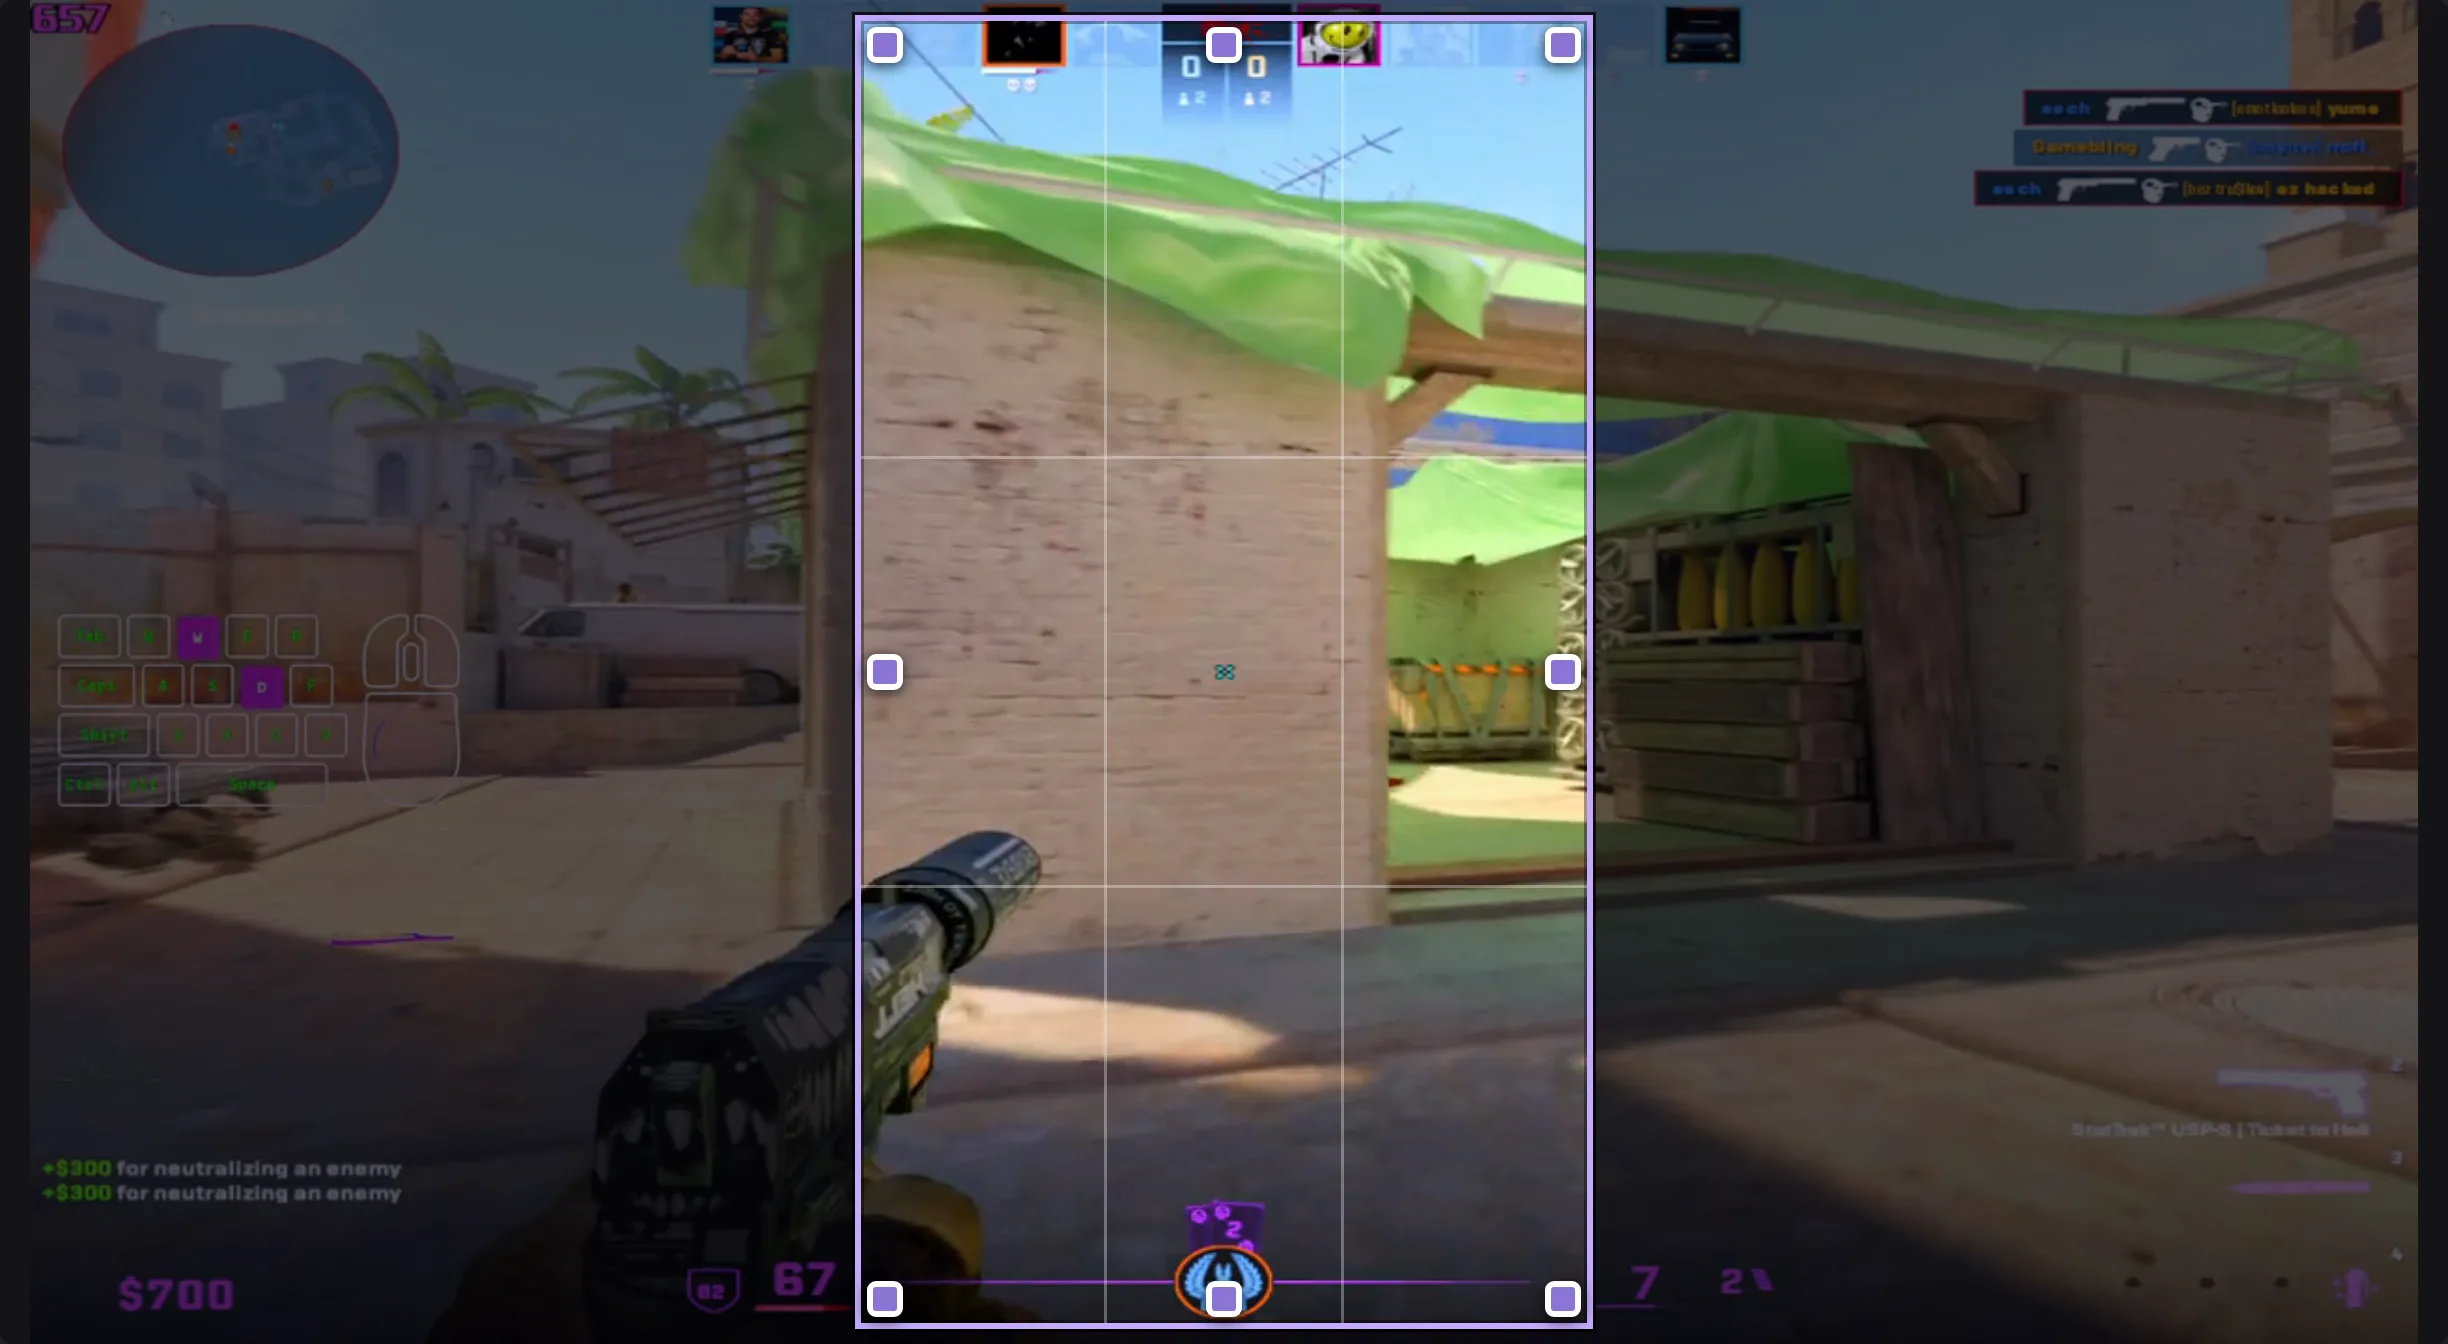
Crop, rotate, and flip are in the This video tab of the Inspector, under Transform. You pick the final size of the video when you export.
Crop
- Select the video in the Library and open the This video tab.
- Under Crop, choose Free or a shape: 16:9, 9:16, 1:1, or 4:3.
- A frame appears on the preview, and everything outside it gets darker. Drag inside the frame to move it, or drag its corners and edges to resize it. If you chose a shape, the frame keeps it.
To remove the crop, choose Off.
Rotate and flip
Under Rotate, give the picture a quarter turn left or right, or turn it upside down. Under Flip, choose Horizontal, Vertical, or both.
Rotating doesn’t change your crop’s shape, so a 9:16 crop still comes out 9:16.
To undo one change, press Ctrl + Z. To start over, click Reset all.
Choose the export size
- Choose Compress or Upscale at the bottom of the window.
- In the Export tab, open Adjust > Video and pick a Resolution, or choose Custom… and type a width and height.
If the picture and that size are different shapes, Sizing in the This video tab decides what happens:
- Fit keeps the whole picture and its shape, so the video can come out smaller than the size you picked.
- Fill fills the size you picked and trims whatever sticks out.
- Stretch fills the size you picked by stretching the picture.
Lossless cut
Cropping, rotating, and flipping all need re-encoding, so Lossless cut leaves them out and copies the picture as it is. Use Compress or Upscale to keep them.
Compress a video to a file size
Pick a target size like 20 or 50 MB, tune the resolution and frame rate, and export one video or your whole Library.
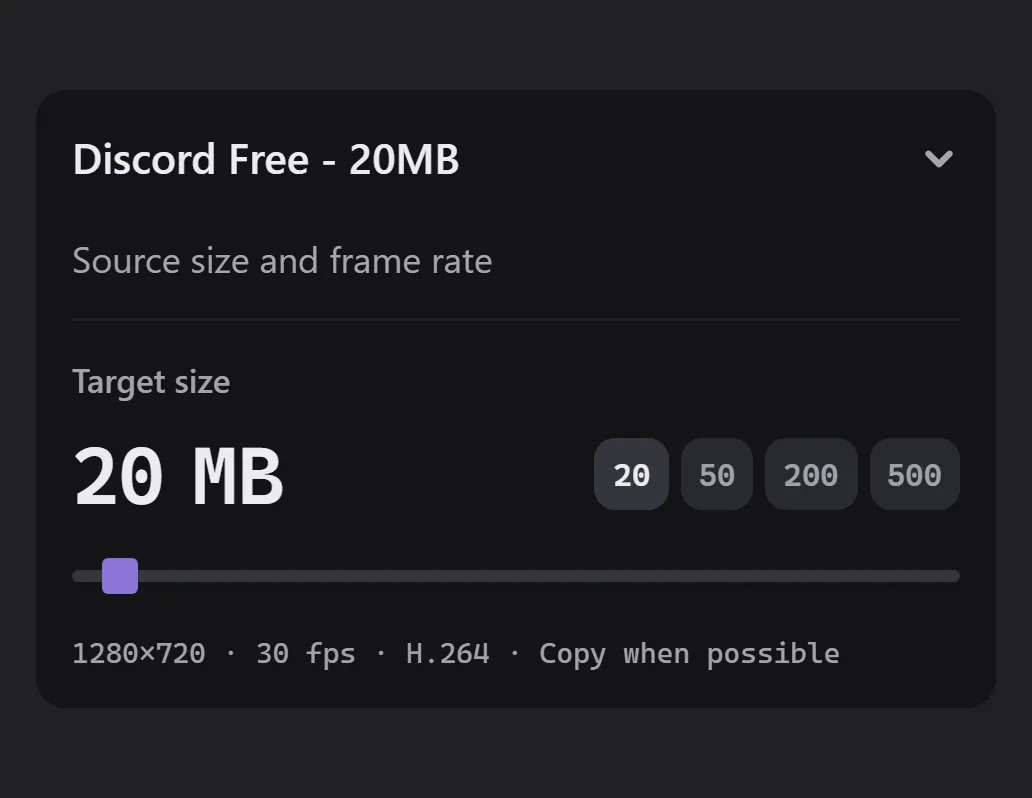
When a chat app or website limits how big an upload can be, tell Tuck the limit and it sets the quality so your video fits. Your cuts, crop, and audio changes all come along.
Set a target size
- Click Compress at the bottom of the window.
- Open the Export tab in the Inspector and pick a profile, or keep the current one.
- Under Target size, choose 20, 50, 200, or 500 MB, or drag the slider to your own limit.
- Click Compress this video.
The export goes into the queue, where you can watch its progress, cancel it, or try again if it fails. To export every video in the Library with the same settings, choose Compress all from the menu next to the export button.
The Library shows how big each video is now and about how big it will be after export, so you can tell if a target is too small for a long video before you start.
Get a cleaner picture at small sizes
A small file has less room for each second of video. Lowering the resolution or frame rate under Adjust > Video gives each frame more of that room, and a smaller, sharp picture usually looks better than a big, blocky one. Cutting parts you don’t need helps too.
Keep settings as a profile
A profile keeps your target size, resolution, frame rate, and encoder together. After changing them, click Save to update the profile, or choose Save as new profile from the export menu. You can manage, import, and export profiles in Settings > Profiles.
Use your graphics card
On Windows, Tuck can use a supported NVIDIA or AMD graphics card to encode, which is usually faster. It only offers the encoders that work on your computer. On Linux, it encodes in software.
Upscale
Upscale works the same way, but you pick a resolution instead of a size: 1440p, 4K, or your own.
Use Tuck from the command line
Compress or upscale videos from a terminal on Windows, with the same profiles and settings as the app.
On Windows, installing Tuck also adds the tuck command. Open a new terminal after installing, then
run this to see everything it can do:
tuck --help
It compresses and upscales whole videos, using the same profiles and settings as the app. For
cutting, cropping, or audio, use the editor. On Linux, tuck just opens the app.
Compress
To compress a video to 25 MB:
tuck compress clip.mp4 --size 25
To use one of your profiles instead, first list them to find the ID you want:
tuck profiles list
Then pass that ID to --profile:
tuck compress clip.mp4 --profile discord-50mb
You can name several videos at once, and Tuck does them one after another:
tuck compress clip1.mp4 clip2.mp4 --size 25
Typing *.mp4 won’t pick up every MP4 by itself. In PowerShell, this does:
tuck compress (Get-ChildItem *.mp4).FullName --size 25
Add --review to see what Tuck will do and confirm it before it starts. With a single video, use
-o to choose where the new file goes.
Upscale
To upscale a video to 1440p:
tuck upscale clip.mp4 --to 1440p
--to also takes 4k. For any other size, give the width and height:
tuck upscale clip.mp4 --resolution 2560x1440
Where the new files go
New files are saved where the app saves them: next to the original video, unless you changed that
in Settings. A compressed copy gets a name like clip_tucked_25MB.mp4, and an upscaled one like
clip_upscaled_2560x1440.mp4. If the name is taken, Tuck adds a number, unless you told it to
replace files.
More commands
To see a video’s resolution, frame rate, codecs, and size (add --json for JSON):
tuck probe clip.mp4
To move your profiles to another computer, export them on one:
tuck profiles export profiles.json
And import them on the other:
tuck profiles import profiles.json
To add Tuck Compress to File Explorer’s Send To menu:
tuck sendto install --kind compress
tuck settings show prints your settings. tuck settings reset puts them back to the defaults and
also replaces your profiles with the built-in ones, so export your profiles first.
In scripts
tuck exits with 0 when every video worked and 3 when one failed. Other codes mean something
stopped it, like a profile that wasn’t found. For more detail, put -v before the command, as
in tuck -v compress clip.mp4 --size 25.
Next: Install TuckAll guides
Install Tuck
Get Tuck running on Windows 10 and 11 or x86-64 Linux, and fix the most common startup problems.
Both downloads come with FFmpeg, so there’s nothing else to install. Once it’s installed, Tuck keeps itself up to date.
Windows
Tuck runs on 64-bit Windows 10 and 11.
- Download the installer from the download page.
- Run it. If Windows says “Windows protected your PC,” click More info, then Run anyway. It says that because the installer isn’t code signed yet. If you want to be sure, check the file against its checksum first.
- Open Tuck.
Setup may also install Microsoft WebView2, which Tuck uses to draw its window. That part needs an internet connection.
Installing Tuck also adds the tuck command, for compressing and upscaling from a terminal. See
Use Tuck from the command line.
To use your own copy of FFmpeg instead of the one that comes with Tuck, choose it in Settings > Media tools.
Linux
Tuck runs on x86-64 Linux with a desktop. The AppImage has everything it needs built in, FFmpeg included.
To install Tuck and add it to your application menu, run this command. It needs curl, python3,
and sha256sum, but not sudo. Run it again whenever you want to update.
curl -fsSL https://tuck.video/install.sh | sh
It runs the install script from Tuck’s GitHub repository, as of the latest release. You can read the script before you run it.
Or download the AppImage from the download page, make it executable, and run it:
chmod +x Tuck-*-x86_64.AppImage
./Tuck-*-x86_64.AppImage
Tuck updates the AppImage itself if it can write to the file. If it can’t, it shows you what’s new and a link to download it.
If Tuck doesn’t start on Linux
If the AppImage says FUSE is missing, run it like this:
./Tuck-*-x86_64.AppImage --appimage-extract-and-run
If you used the install script, run this instead:
tuck --appimage-extract-and-run
If the window stays blank, start Tuck without the GPU:
WEBKIT_DISABLE_COMPOSITING_MODE=1 ./Tuck-*-x86_64.AppImage
If only the video previews stay blank, try:
TUCK_WEBKIT_COMPOSITING=1 ./Tuck-*-x86_64.AppImage
Tuck uses the GPU to make previews smoother. In a virtual machine, or after a crash, it switches to
software drawing on its own. To make it always use the GPU, start it with
TUCK_WEBKIT_ACCELERATED=1.
Report a problem
If something goes wrong, open Settings > About, click Copy next to Diagnostic report, and paste the report into a GitHub issue. The report leaves out your file paths.